Recently I have been upgrading my development pipeline and looking for ways to improve my dev ops. One of the biggest things that I knew I could improve upon was my build pipeline for my Unity games.
Since I have started working on Aurum Kings, I have had to build for Windows, Mac, and Linux in an effort to make the game as accessible as possible. What I was doing at first was just building to one platform, switching, and then building to the other. Needless to say this got old pretty fast, so I started looking into Jenkins. Jenkins was the obvious choice for me, not only because I spent a ton of time hearing about it at GDC, but because it is free and open source.
By the end of this guide you will be to use Jenkins to build your Unity game on a given time interval, or whenever the repository gets updated.
Something to note before starting is that this is done on Windows 10, so your process may be a bit different on Mac, but it should be mostly the same. You theoretically can do this on a Linux server as well, but I would not recommend it because the Unity Linux version is not very stable and may cause weird errors.
Step One — Installing / Initial Setup of Jenkins
Download Jenkins and follow the installer from their site.
After it’s done, it should automatically open up a new tab in your browser. If it doesn’t, just go to http://localhost:8080 (Or whatever the address of your server is) .
After verifying your secret Jenkins password, install their suggested plugins (If you know more about what plugins that you want than feel free to change this).
Once this is done, then all that is left to do is install the GitHub Integration plugin. Go to Manage Jenkins > Manage Plugins > Available (Tab) and search for GitHub Integration. Select the checkbox for it and then hit Install. You can restart Jenkins after it is installed if you want, but you don’t necessarily have to.
Step Two — Allowing Jenkins to access your repository
To allow your Jenkins server access to your GitHub repository, you have to give it a deployment key. A deployment key is just an SSH key pair that Jenkins and GitHub will use to access each other.
First you have to generate your key pair on your Jenkins machine. There are multiple ways to do this, but I found the easiest way was just to use the command line. The following command will generate a key pair for you: ssh-keygen -t rsa
On Windows 10 the keys will be saved to your .ssh folder under your user. There you can open up the keys in any text editor to see them.
Next you have to make the repository aware of your Jenkins public key. To do this, go to your repository > Settings > Deploy keys.

Copy and paste the contents of your public SSH key into the “Key” field and hit “Add key”. Now that Jenkins has read only access to your repository, we have to add the credentials to Jenkins itself.
To do this go to Jenkins > Credentials > Global > Add Credentials. The kind of credential is SSH Username with private key. You can then paste in your private key and save it. Jenkins and GitHub should now be able to integrate together!
step three — Creating a job
Now that Jenkins can access your Git repo, it can use that to build your Unity game!
To make a new job, just select “New Item” in the top left corner of the Jenkins home page. Then give your Job a name, and select a Freestyle Project.
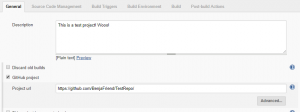
From here, you can see a couple of options. Give your job a description, and paste your GitHub URL into the “GitHub Project” section.

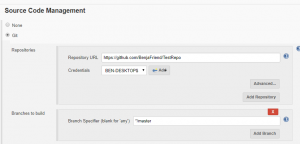
Under “Source Code Management” select Git. Enter your repository URL again, and select the credentials that you entered earlier. Notice that you can select which branches to build here as well.

Adding Build triggers
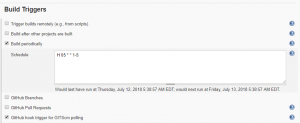
Build triggers are what make Jenkins start the build steps. We will have one on a Cron task to run every morning, and one when the Master branch of our repository is updated.
The Cron task is simple, as you can just select the “Build Periodically” and type in the times you want it to run. For example, H 05 * * 1-5 will run a build at 5 AM Monday through Friday.
Note – In order to use GitHub hook integration, your Jenkins server needs to be accessible to GitHub. This means that you will either have to port forward your router for Jenkins, or you could use some sort of cloud service.
In order to have Jenkins build when the branches are updated, check the “GitHub hook trigger for GITScm polling” option.

Back in your GitHub settings, go to “Integration & services” tab in the repo settings. Hit the Add Service button, and select “Jenkins (GitHub plugin)”. All you have to do to set this up is follow the instructions and type in the following hook URL:
http://< YOUR JENKINS SERVER ADDRESS >/github-webhook
That’s it! Jenkins will now build when the master branch updates.
Build Steps
The last thing to do with your Jenkins server is to actually tell it how to build your project. I wrote a quick Python script to call the command line arguments for Unity that I wanted.
You can see my Python script on my GitHub here. This script in particular just runs a Windows build with output going to a folder named by the time and date.

As you can see, it is pretty simple to add in a build step. Personally I like to just run a Windows batch command to run my Python script, but there are a ton of different ways to do this.
This is also where you could run test suites, zip up the build and post it somewhere, etc.
Conclusion
Overall, integrating Jenkins into my development has been really cool and fun to learn. The process has improved the scalability of my work greatly, as well as allowing me to test and iterate faster throughout development.
I would highly recommend setting up a Jenkins server of your own, especially because of how low the barrier to entry is. You could do this with an old laptop sitting in a closet, or with an AWS instance. Just remember that if you are using an old laptop in a corner that you should not rely on that to be the only spot where your builds are. Always back up your data!!
I hope this gives you a clear idea of how to use Jenkins, and happy automating!